REFLECTION
INTRODUCTION
This assignment will carry out a targeted analysis of some of the tasks that have been completed before, summarizing the existing problems, and then giving the best solutions to the emergent stages according to the problems. Through analysis and summarization, I can learn more about what I have learned at this stage.
BRIEF REVIEW
Project 1 - The foundation study of making different metal shapes.
Through the first half of the semester, we learned to use different methods and equipment to make different shapes of metal. At the same time, we can explore the different shapes in the production process, so that the shape of the metal can be as we expected. In project 1, we were allowed to exercise shape-making techniques by making different shapes. At this time, we learned more about using different tools and metal production equipment in the workshop. On the other hand, the complex shapes in project 2 can be better prepared by the learning in project 1.
Project 2 - Making the fuel tank of motorcycle
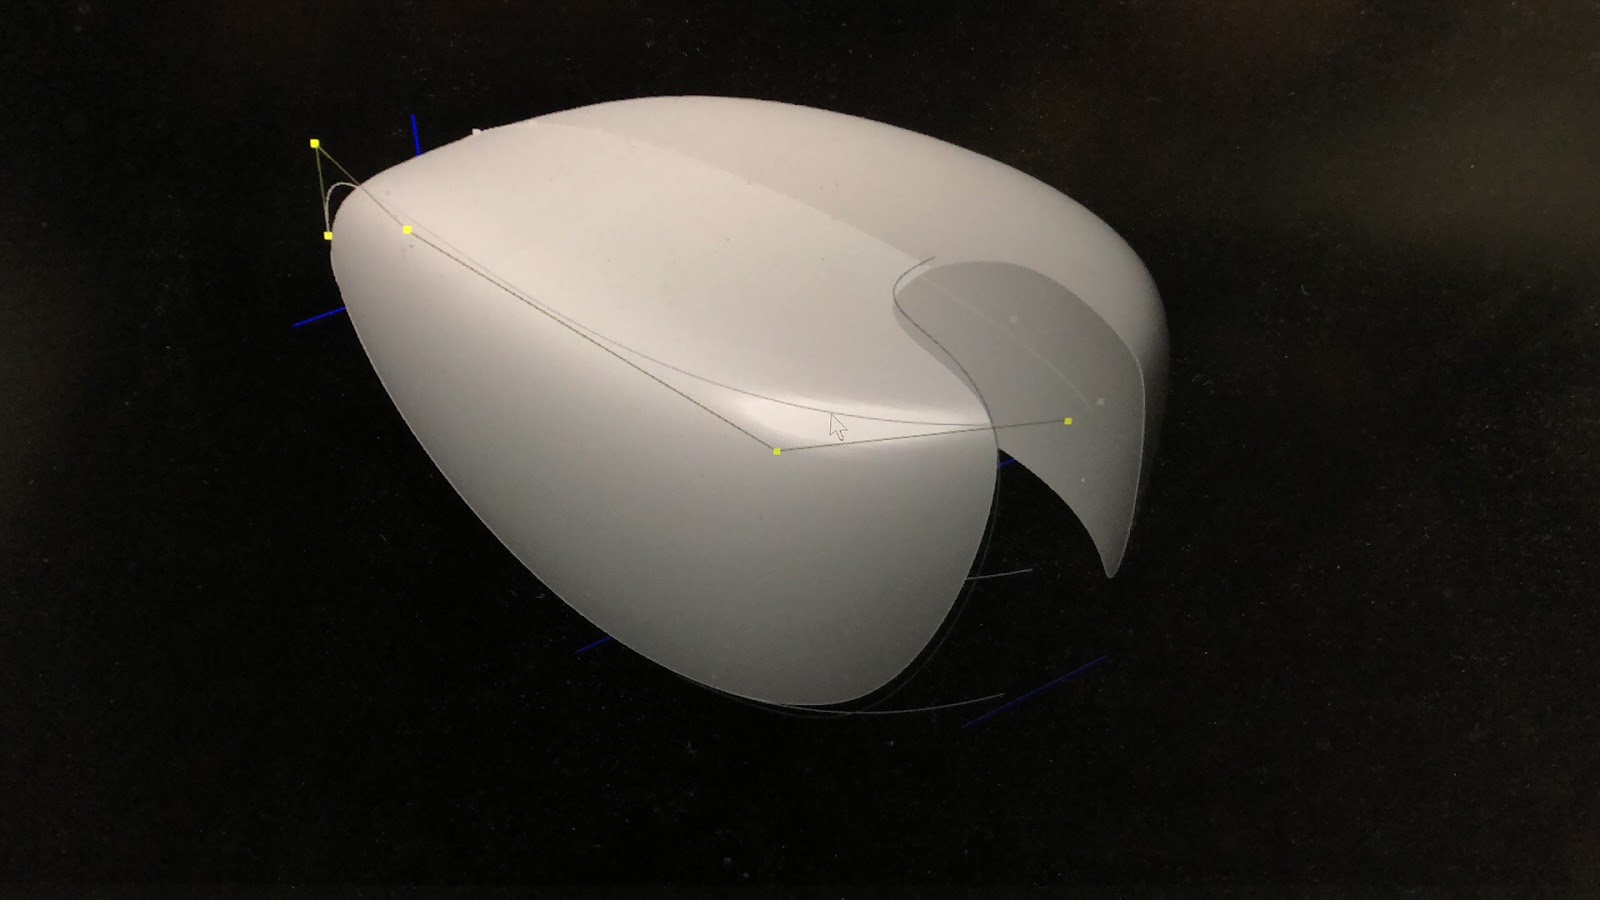
The task of the whole job is to create a relatively more difficult metal shape based on the knowledge and techniques learned in Project 1, which is the fuel tank that we made in Project 2. The entire project not only requires us to imitate physical objects through techniques, but also requires us to organize our previous preparation work and produce abrasive tools so that the project's later work can be organized. The preparatory work was based on learning different software to create a digital 3D model, and by making a 3D model to produce a copy of the grinding tool, I would like to emphasize here that the role of the grinding tool is to compare with the metal we make, so that the shape of the metal can be better with the shape of the abrasive. In general, the whole idea is to experience the entire process of creating objects to make objects through practice, and to skillfully apply the techniques learned in Project 1 to the process of making objects.


THE BENEFIT AND REVIEW IN THE STEPS OF PROJECT 2
The reason why I chose to conduct a specific analysis of item 2 is as follows. First, Project 2 has a representative role as a project with a complete creative process. From the entire production process, we can intuitively discover some of the parts that we have missed or are lacking in the production process. Second, all the shapes produced in Project 1 belong to the initial learning process, so there must be some problems, so that we can not be used as a typical case for us to summarize and reflect on (the production process of Project 1 is slightly simpler than Project 2).
STEP 1 - GROUP OF 10 PEOPLE TO MAKE THE 1:1 TANK GRINDER
1. We went moodle and chose the third motorcycle tank and download the Rhino file
2. Using the Rhino to create the surface of the tank and put it into the Slicer.
3. Using the Slicer to create the pieces that we need to laser cut and save it into the Ai file.

4. Bring the Ai file to the lab and using the laser cut machine to cut it.

5. Finish the laser cut, we combine all the pieces together to be the grinder.

6. The finished grinder.

Benefit
When generating abrasive tools in software, we reduce the error of grinding tools and real objects by increasing the number of slicers so that we can produce more accurate shapes when using abrasive tools.Review
1. Because the preparatory work only requires the creation of one 3D grinding tool, only one person in the entire 10-person team is using the software to operate, while others are just watching. On the contrary, members of other groups will use this time to clearly allocate the steps to be performed later, which will save more time on the production of aluminum sheets.2. Due to our unfamiliarity with the modeling software, we have designed a solid object when we make the grinding tool. When we were about to complete, we found that the object being copied had a gap, and the size of the gap could only be added to the production by means of guesswork, so that the gap in the final product was not neat enough.
STEP 2 - GROUP OF 3 - 5 PEOPLE TO IMITATE FUEL TANK
Since our group has more people than the normal group, we have divided the work into four parts after discussion the right part, the left part, the top part and the combined work. Except that the top part is done by two people, the other parts are all done by one person. my main job is to make the right part of the tank, which is also the most difficult part in this project.1. first of all, I cut a large piece of aluminum into a piece of aluminum that is slightly large than the right part to the drum to ensure that the size of the piece is not smaller than the part I will make. The extra parts will be cut off after I determine the size.


Benefit
By trimming a slightly larger sheet of aluminum, you can set aside enough space to make adjustments. If you find that there is something wrong with the process, you do not need to re-cut a new aluminum sheet to make it.Review
Due to the uncertainty of the size of the abrasive tool, the part I set aside was so large that when I trimmed the excess part in the later period, the already completed part was deformed due to cutting so that it needed to be revised.2. I made a simple bending facility by using discarded wood. The aluminum sheet was placed in the gap between the wood and the table, and the aluminum sheet was evenly bent by hand. Through multiple bending and contrasting, the bending angle of the aluminum sheet was matched with the grinding tool.


Benefit
The advance bending of the aluminum sheet will reduce the subsequent tapping of the aluminum sheet, and excessive tapping will cause deformation of the aluminum sheet. On the other hand, the horizontal arc ratio of the side of the grinding tool is not very large, so it is to manually bend the aluminum sheet to save the subsequent production time.Review
Since the instrument used is purely hand-made, it will appear very rough and may cause marks on the surface of the aluminum sheet.3. Cover a piece of white paper to the right side of the grindstone, which is the part I will make soon. Use a crayon to mark where aluminum pieces need to be played on white paper, and it is easy to identify where to bend when tapping.

Benefit
By carefully dividing the parts that are about to be hit, it is possible to distinguish the tapping areas more clearly, so that aluminum foils are not repeatedly hit by mistakes. Repeated tapping will deform the part that has been completed, and it will not be able to fit the abrasive tool again.Review
When I plotted the lines, I just drew the lines onto a white paper and did not draw them on the aluminum sheet. This may cause the aluminum sheet to produce a certain degree of error, which cannot be matched with the grinding tool. If the line is drawn onto the aluminum sheet, the curvature of the aluminum sheet will be more accurate.4. Then use the hammer to tap the marked aluminum sheet to make the entire aluminum sheet concave in the middle.


5. I made rough shapes by repeatedly tapping and comparing. Then, cut off the excess parts around the aluminum sheet, and then use tweezers to smooth the edge of the aluminum sheet.


Review
Because the length of the metal shear is limited, when the shape of the aluminum sheet is modified, the edges of the aluminum sheet become uneven and the aluminum sheet is slightly deformed.6. After cutting, there will be a slight change in the shape of the aluminum sheet. Place the aluminum sheet on the abrasive tool and modify it with a hammer.

Review
Due to the fact that the previous work was not very reasonable, there was an error in comparison with the grindstone. We forced the aluminum sheet to beat on the grinding tool.7. Then use an English Wheel to squeeze the surface of the aluminum sheet. The aluminum sheet looks smooth and flat

Review
When using the English Wheel, the aluminum sheet was squeezed too hard, causing the aluminum sheet to be slightly deformed. The consequence of this is that it is necessary to beat the aluminum sheet several times, wasting more time.8. My part is completed

9. After that, I will help the other members of our group to combine the parts of each person. First of all, we have to use the edger to press the parts where the left and right sides coincide with the upper part out of the groove. The upper part can be forced on the left and right parts to set up the fuel tank and fix it on the table.


评论
发表评论